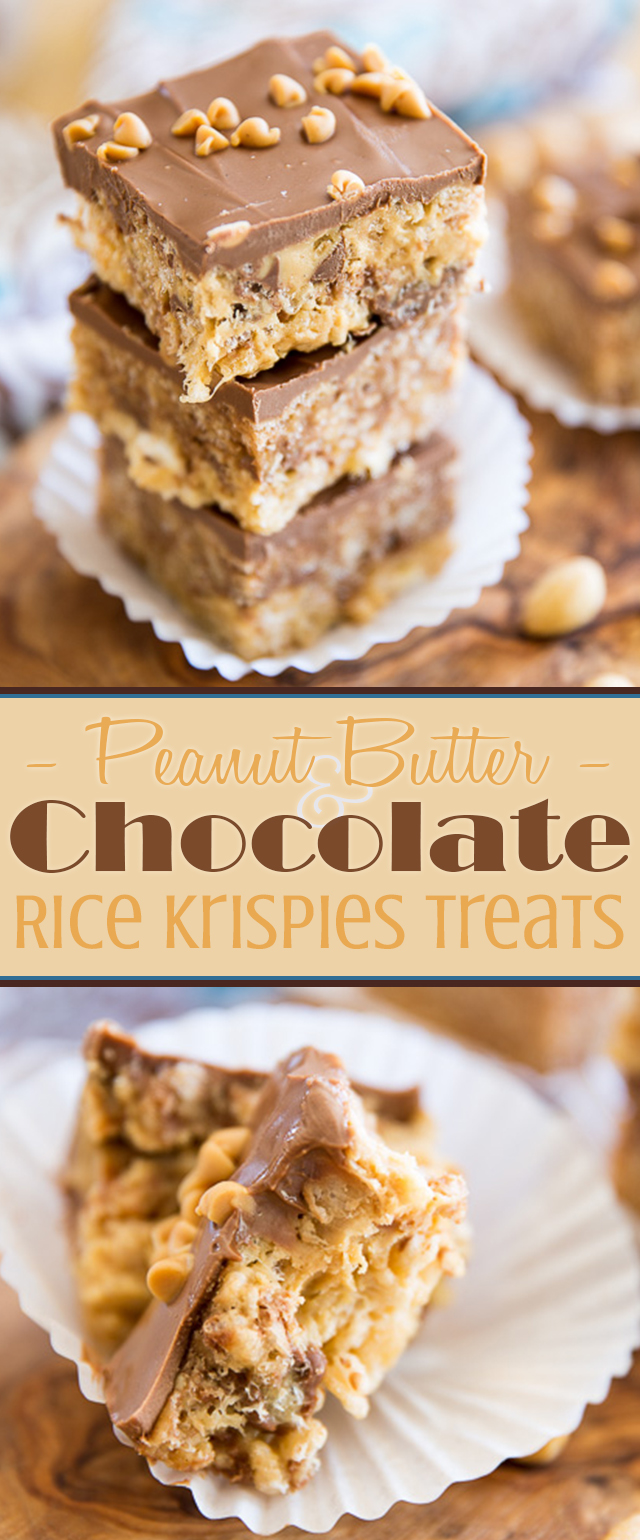
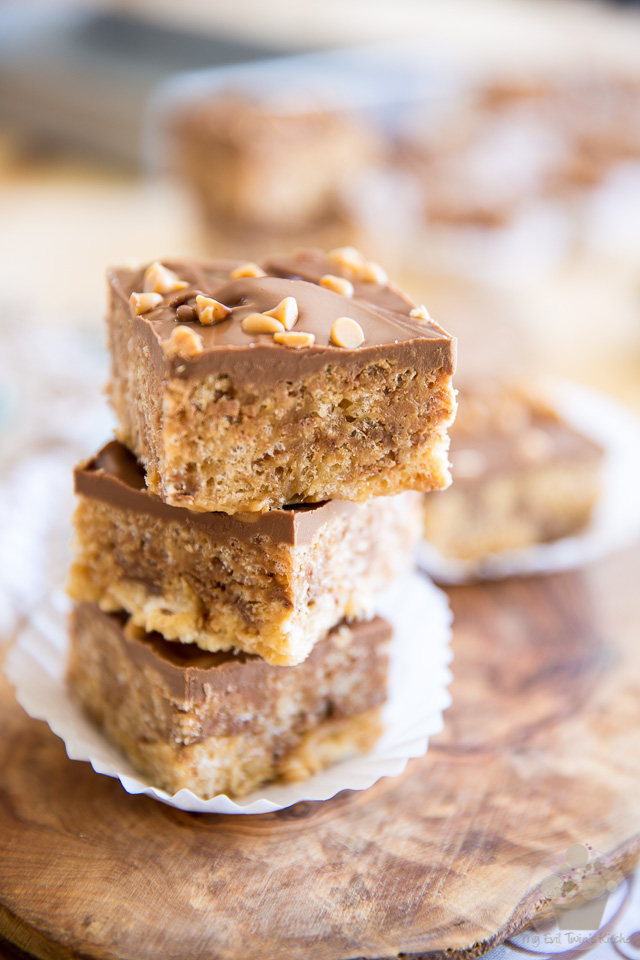
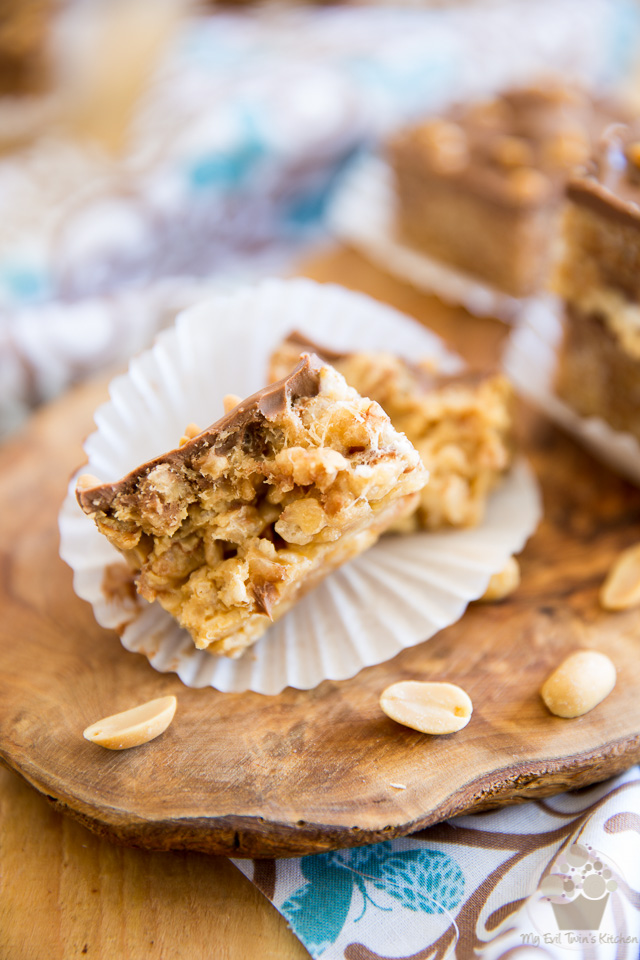
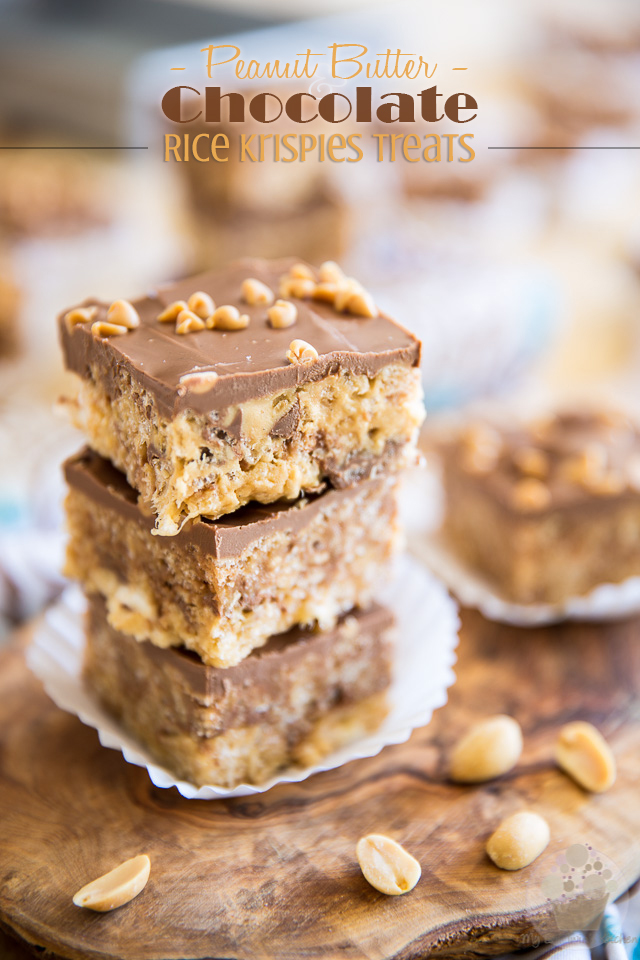
These Peanut Butter Chocolate Rice Krispies Treats totally take the classic squares to the next level. Guaranteed to please the peanut butter lover in you!
Ooops. Looks like I created yet another recipe that has Peanut Butter in it. What can I say, I really, truly am an addict. I swear though, after these Peanut Butter Chocolate Rice Krispies Treats, I’ve only got one more peanut-y recipe in the pipes, and then I’ll be giving you guys a break.
Besides, I totally polished off the jar when I made the aforementioned recipe (they’re Peanut Butter Chocolate Corn Flakes Clusters, just in case you’re curious) and haven’t made a fresh batch yet. YET, being the keyword here. Let’s see how long I can manage to go without a jar of my precious homemade creamy peanut butter in my pantry. My guess is, not long… not long at all! But I promise that I’ll try and save it for my morning toasts and keep it away from my baking inspirations.
At least for a little while. ‘Cuz if I keep at it, I’m gonna have to rename this place into something like The Peanut Butter and Cheese Factory dot com…
Hey, if you have suggestions for me to help keep that peanut butter out of my mind, please send them my way! I was thinking Pecan Pie Bars, Linzer Torte or Giant Oatmeal Cookies for my next treat. Those should be safe bets, don’t you think? I shouldn’t be too tempted to throw in a little bit of peanut butter in any of these, right? Mind you… the oatmeal cookies may be a tad dangerous! Oatmeal and peanut butter do work pretty well together.
I’m bad, I know! Hopefully, this’ll pass… eventually!
That said, I’m sure you’ll be more than happy that I be on such a huge peanut butter kick once you’ve had a taste of these babies. Personally, I’ve always had a thing for Rice Krispies Treats, and use to eat them practically every day when I was a kid. They would sell them for 10¢ a piece at the school cafeteria… at that price, it was way too easy to indulge, even for a child!
But these… these ones totally take an already delicious treat straight to the next level. I’m sure that back in the years, I’d have gladly paid 50¢ for a piece, and perhaps even more!
Seriously, now that I’ve had a taste of these pimped RKT, I don’t think that I’ll ever be able to go for the plain-old-kinda-boring version anymore.
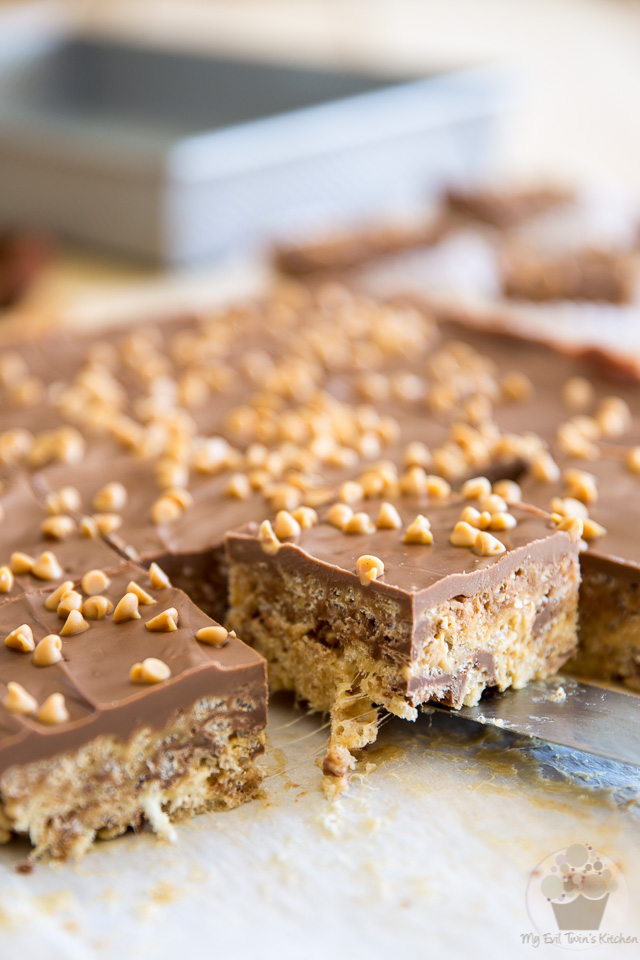
For these guys, they mean serious business: not only are they EXTREMELY tasty, sticky and sweet, they are also super soft, ooey, gooey, crispy and melt-in-your-mouth creamy. Yes, all of that at the same time. Plus, the addition of peanut butter and chocolate totally takes them over the top. I’d say they’re like a little piece of heaven in every bite. Well, if you’re a peanut butter lover, anyway…
Oh, and hey, did I mention they’re super easy to make, too? For real, what’s there not to love about them?
STEP-BY-STEP INSTRUCTIONS & PICTURES
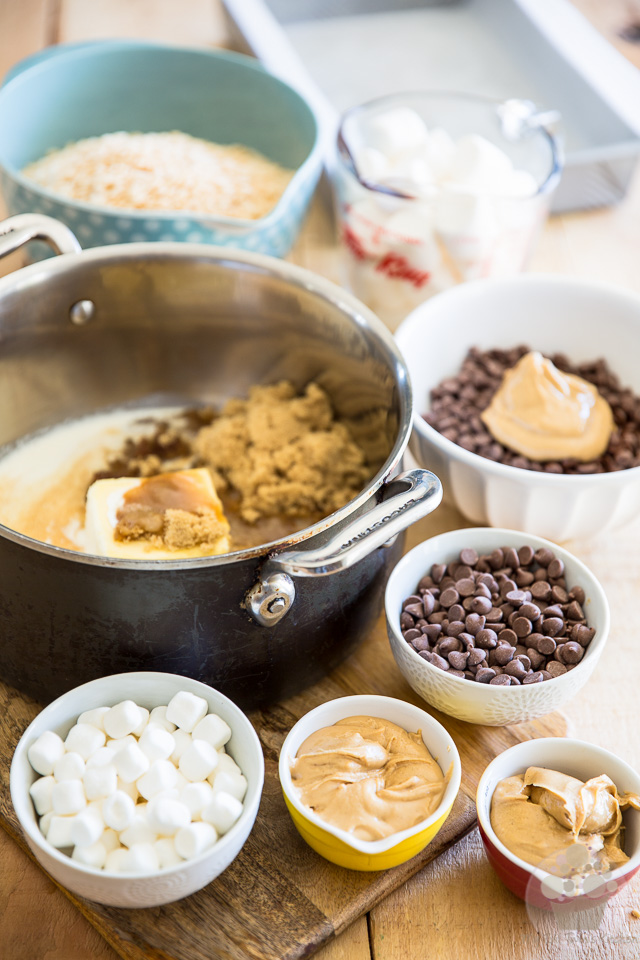
If you’re like me and like to do a proper mise-en-place before you start, here’s what you’ll want to do:
Grease and line a 9″ x 13″ baking pan with parchment paper, making sure to leave a bit of an overhang on either side for easy removal.
In a large saucepan, combine:
- 1 cup brown sugar
- 3/4 cup butter
- 1/2 cup heavy cream
- 1 tbsp pure vanilla extract
Then measure / weigh the rest of your ingredients:
- Bowl 1 – 4 cups marshmallows
- Bowl 2 – 1/2 cup creamy peanut butter
- Bowl 3 – 8 cups Rice Krispies Cereal
- Bowl 4 – 1 cup mini marshmallows
- Bowl 5 – 1 cup milk chocolate chips
- Bowl 6 – 1/2 cup creamy peanut butter
Finally, in a 7th (microwave safe) bowl, combine:
- 2 cups milk chocolate chips
- 1/3 cup creamy peanut butter
- 1 tbsp peanut oil
I know, that’s a lot of bowls, but most of them you’ll just have to wipe clean, so it’s not as bad as it looks…
All done and ready to go? Good!
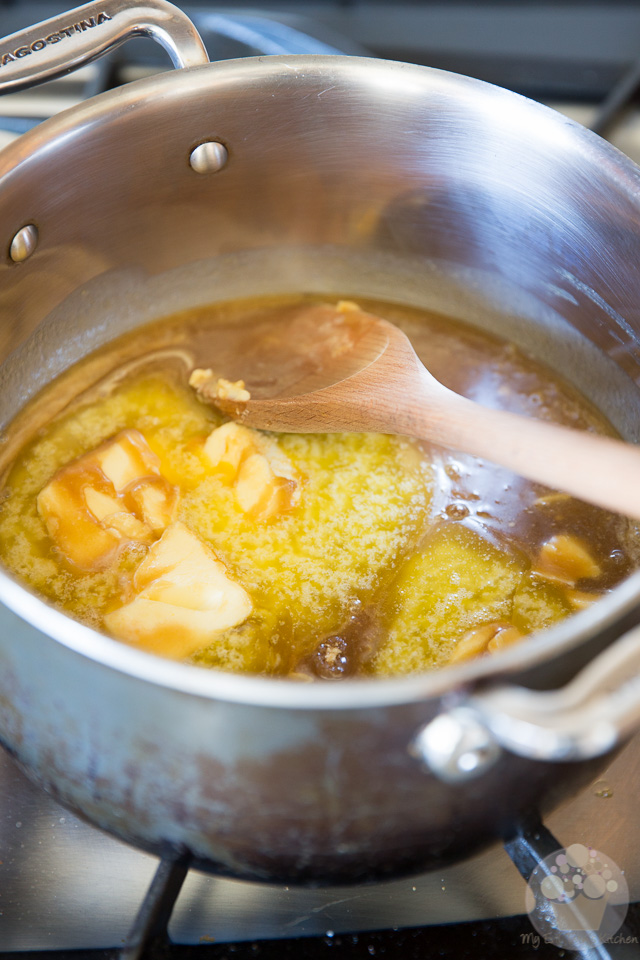
Place the saucepan with the brown sugar, butter, heavy cream and vanilla extract over medium heat…

…and slowly bring to a boil, stirring often.

As soon as the mixture starts to boil, add the 4 cups of marshmallows and 1/2 cup of peanut butter…
About those marshmallows: I chose to use the large ones here because I had them in my pantry, but you could very well use minis, if you wanted to.
As a matter of fact, you need a total of 10 ounces of marshmallows to make these Rice Krispies treats, so if you are going to buy some specifically to make this recipe, just get a 10 ounces bag of mini marshmallows. Use 4 cups now, which will leave you with just enough to add the one cup that’s called for a little later down the road.
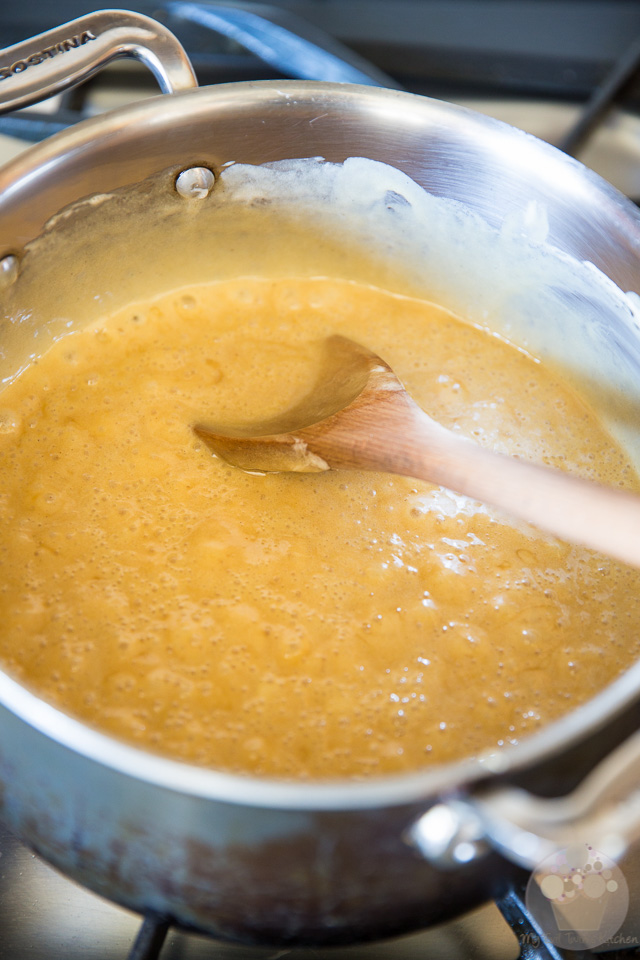
Continue cooking your mixture, stirring constantly, until the marshmallows are completely melted and the sticky syrup starts boiling once again. Remove from heat.

Add the 1 cup of mini marshmallows…

…followed immediately with the 8 cups of Rice Krispies cereal.
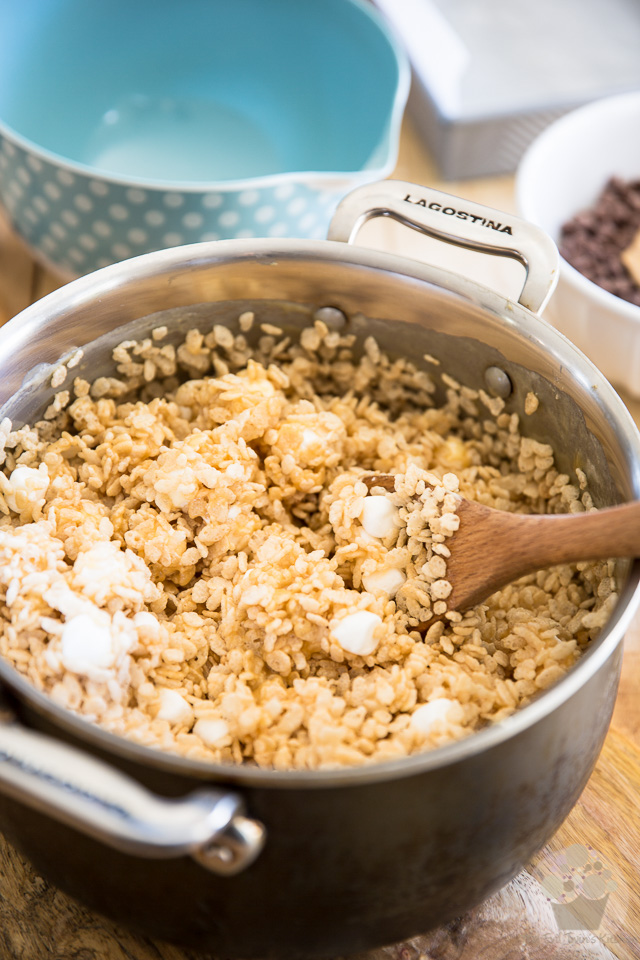
Stir delicately until the newcomers are about half coated with the melted peanut butter/marshmallow sauce.
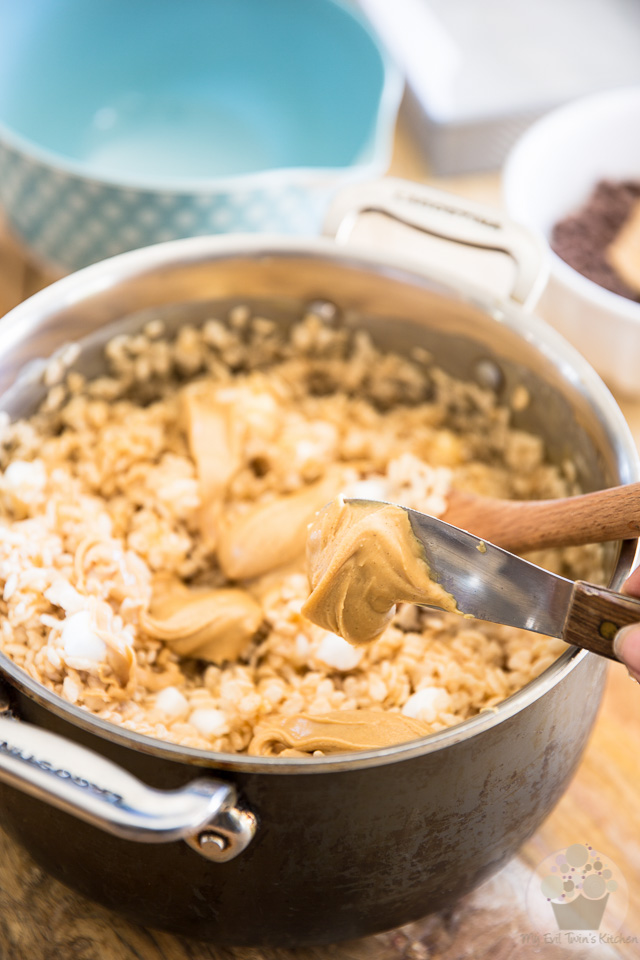
Add the other 1/2 cup of peanut butter to the cereal, dropping it across the entire surface of the pan by the tablespoonful.
It’s important that you don’t dump your peanut butter all in one place because when you start mixing this, you won’t be mixing for more than a few seconds and you want your peanut butter to be somewhat well distributed between all the treats.
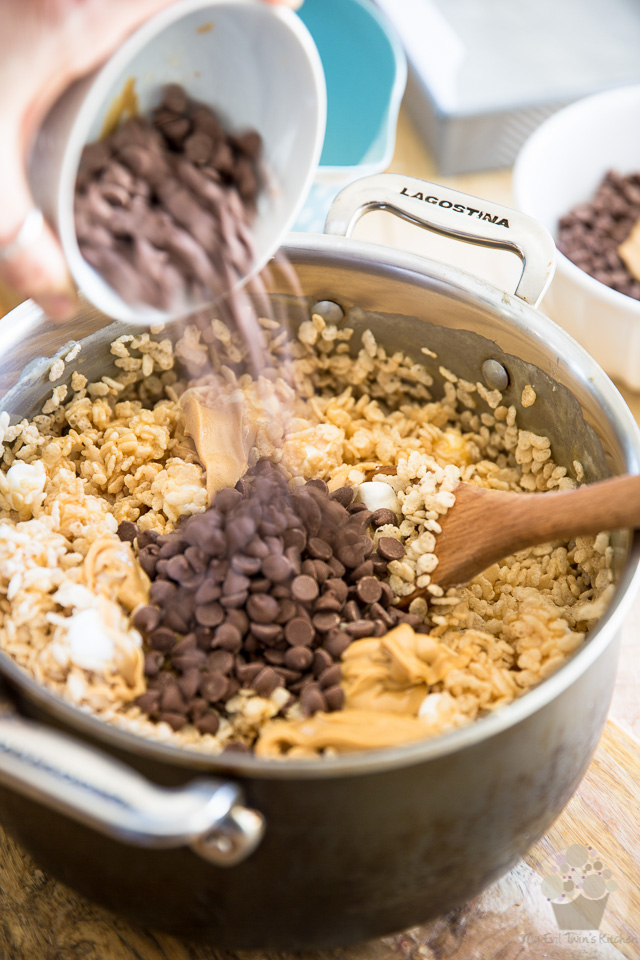
Once all the peanut butter has been added, throw in the chocolate chips and immediately start mixing.
Working quickly, stir until the ingredients are just barely combined: you want your marshmallows, peanut butter and chocolate chips to remains sort of unevenly distributed. Ideally, you don’t want your chocolate chips to completely melt, either.
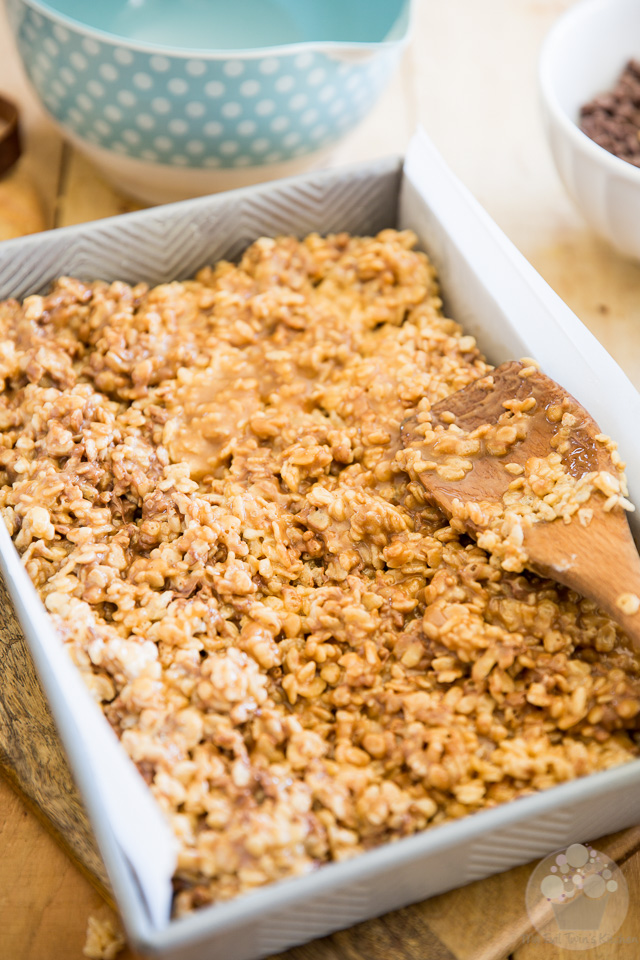
Transfer the mixture into the prepared pan and lightly press into an even layer.
It’s important that you do not use too much pressure here, otherwise your bars would end up really dense and sort of dry. Just press down very delicately with a wooden spoon or rubber spatula…
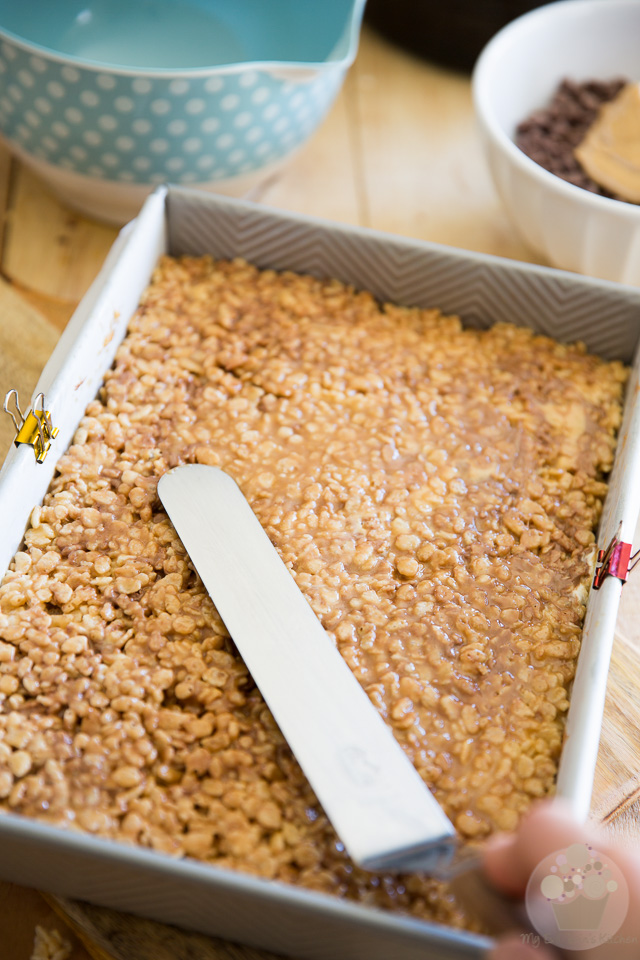
… and then finish smoothing the surface with an offset spatula .
Oh, and here’s a great tip for you: if you find that your parchment paper wants to sort of curl in and be a major pain in the butt get in the way of what you’re trying to do, simply hold it in place with little paper clips!
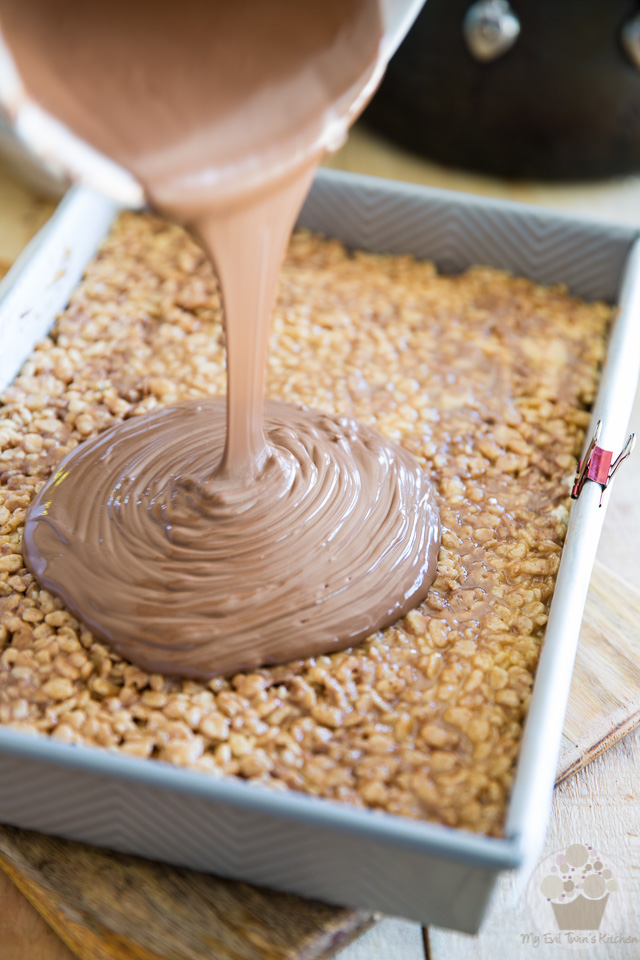
Now make the milk chocolate topping: grab the bowl with the milk chocolate chips, peanut butter and oil and place it in the microwave for 30 seconds. Allow to rest for 30 seconds and then stir for 30 seconds. If there are still lumps of unmelted chocolate, repeat the process but for 20 seconds this time, and continue doing that until the chocolate and peanut butter are completely melted and well combined.
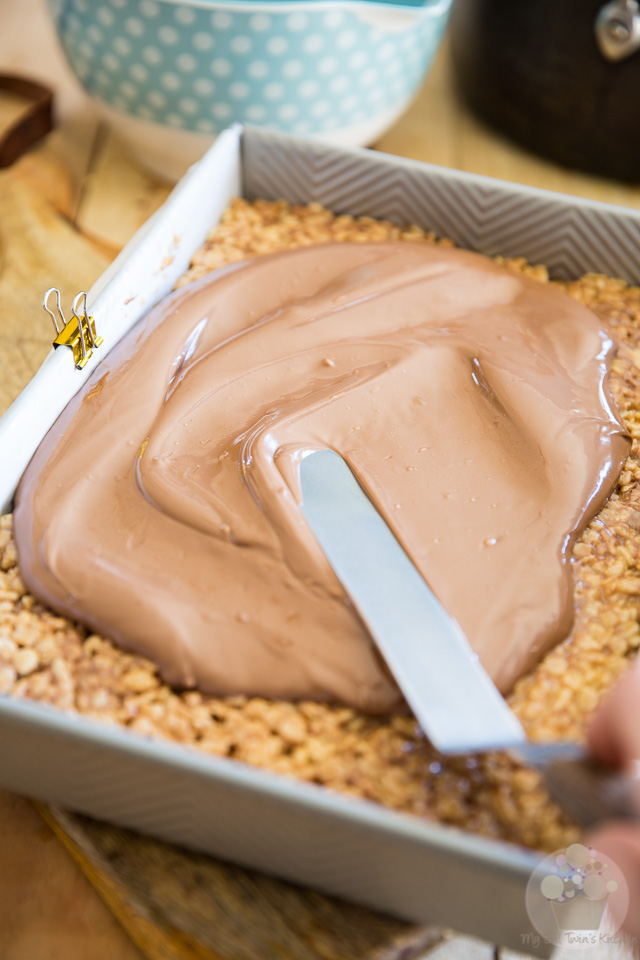
Pour the milk chocolate topping over the Rice Krispies treats and spread into an even layer with an offset spatula.
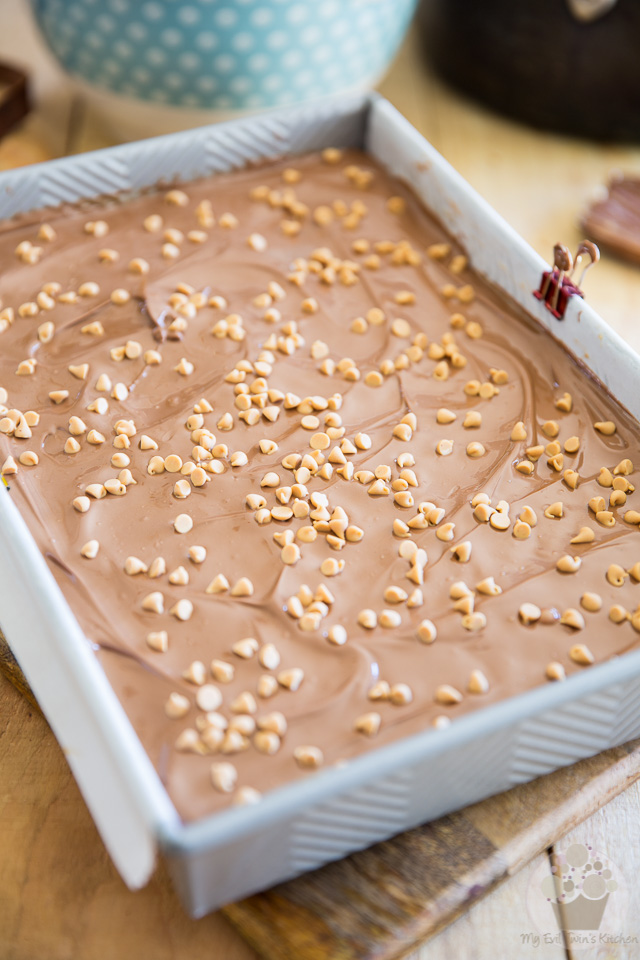
Garnish with the mini peanut butter chips, if desired.
If you didn’t have mini peanut butter chips on hand but still felt like decorating the top of your Rice Krispies treats, you could also use a handful of chopped peanuts.
Granted, chopped peanuts are not as adorable, but they would still do the trick (plus, they would add a little bit of an extra crunch)!
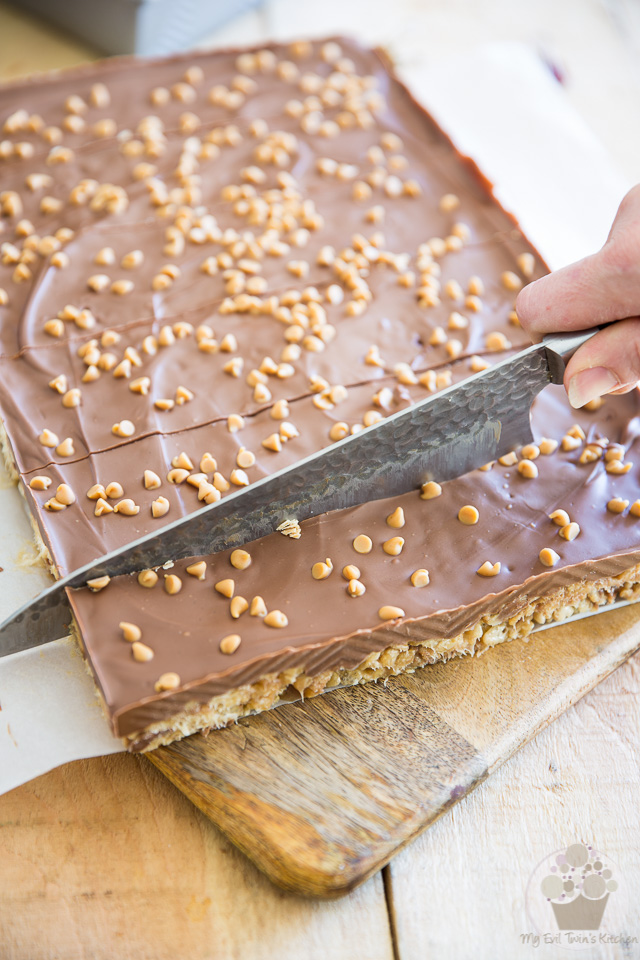
Send the bars to the refrigerator for at least 30 minutes, until the chocolate topping is completely set. You’ll know it’s ready when it has no more sheen to it.
Use your sharpest knife to cut into 24 bars and then let yourself go!
Oh, one more thing before you do that… I strongly suggest that you use an offset spatula to lift the bars, because they are so super sticky, they’ll sort of want to cling to everything, even parchment paper!
And there you have it. All good and ready to go.
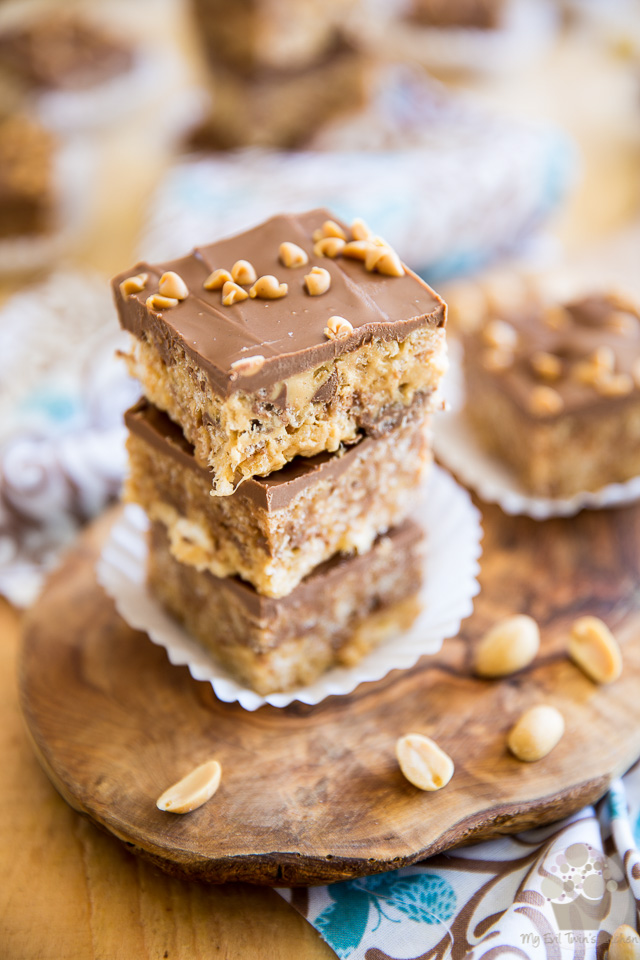
You can store the finished bars in the refrigerator or at room temperature, providing that you keep them in a cool dry place. If you refrigerate them, though, they will become much firmer and won’t be quite as soft and ooey and gooey…
Personally, I prefer to keep mine at room temperature, but ultimately, the decision is yours.
Except perhaps if it’s like really super hot out and you can fry an egg on the kitchen counter. Then perhaps you’d be better off keeping them in the fridge!

Ingredients
- 1 cup (200g | 7.1oz) light brown sugar
- 3/4 cup (180g | 6.3oz) butter
- 1/2 cup (120ml) heavy cream
- 1 tbsp pure vanilla extract, (store-bought or homemade)
- 4 cups (225g | 7.9oz) marshmallows (you could also use mini)*
- 1/2 cup (120g | 4.2oz) creamy peanut butter (I used homemade)
- 8 cups (225g | 7.9oz) Rice Krispies cereal
- 1 cup (56g | 2oz) mini marshmallows
- 1 cup (180g| 6.3oz) milk chocolate chips
- 1/2 cup (120g | 4.2oz) creamy peanut butter (I used homemade)
- 2 cups (360g | 12.7oz) milk chocolate chips
- 1/3 cup (80g | 2.8oz) creamy peanut butter (I used homemade)
- 1 tbsp peanut oil
- 2-3 tbsp mini peanut butter chips
Instructions
- Grease and line a 9" x 13" baking pan with parchment paper, leaving a bit of an overhang on either side for easy removal.
- Combine brown sugar, butter, heavy cream and vanilla extract in a large saucepan and bring to a boil over medium heat. Stir in the marshmallows and peanut butter and continue cooking, stirring constantly, until the marshmallows are completely melted and the mixture starts boiling once again. Remove from heat.
- Add the mini marshmallows and Rice Krispies and stir until they are about half coated with the melted marshmallow mixture. Add the peanut butter to the cereal, dropping it across the surface by the tablespoonful and then throw in the chocolate chips. Stir quickly until the ingredients are just barely combined and then pour the mixture into the prepared pan; lightly press into an even layer and smooth the surface with an offset spatula .
- Make the milk chocolate topping: in a microwave safe bowl, combine the milk chocolate chips, peanut butter and oil and place that in the microwave for 30 seconds. Allow to rest for 30 seconds and then stir for 30 seconds. If there are still lumps of unmelted chocolate, repeat the process but for 20 seconds this time, and continue doing that until the chocolate and peanut butter are completely melted and combined.
- Pour this right over the Rice Krispies treats and spread into an even layer with a spatula. Garnish with the mini peanut butter chips, if desired.
- Refrigerate for at least 30 minutes, or until the chocolate topping is completely set. Cut into 24 bars and serve. Store in a cool dry place or in the refrigerator, in an airtight container, for up to a week.
Notes
*If you are going to purchase marshmallows specifically to make this recipe, there is no need to buy both sizes. Just get a 10oz bag of mini marshmallows and use minis instead of full sized in the first part of the recipe.
love peanut butter & chocolate together! this is divine!
Divine is right, Thalia. Nothing beats peanut butter and chocolate together (or peanut butter and anything, for that matter…) 😉
Thanks for dropping by, I appreciate the visit!